Essential Tips for Successful Sod Installation Services
Tired of staring at a yard full of weeds and bare patches? If you want a lush, green lawn this season instead of next, sod is your answer. While the promise of an instant lawn is exciting, timing your project is the first step to success. For most homeowners, the best time of year to lay sod is during the cooler months of spring and early fall.
This happens because mild temperatures cause less stress on the new grass, allowing its roots to strengthen before the intense summer heat comes.
Once you've picked a season, you need to choose the right grass. The biggest mistake in any sod installation is picking a type that doesn't match your yard's sunlight. Think of it as a simple choice between sun-loving and shade-tolerant grasses.
- If your yard gets 6+ hours of direct sun, then choose a warm-season grass like Bermuda or Zoysia.
- If your yard has trees and gets 4-6 hours of sun, then you need a shade-tolerant variety, like a Tall Fescue blend.
To determine if your yard has "full sun," simply check it at three different times on a sunny day---say, 9 a.m., 12 p.m., and 3 p.m.---and note which spots are in direct light. This simple sun map will help you confidently select the right turf and ensure that beautiful green result you're after.
How to Measure Your Yard and Avoid Wasting Money on Sod
Before you can estimate costs, you need an accurate measurement. Grab a tape measure and find your yard's length and width. For a simple rectangle, just multiply those two numbers to get your square footage (e.g., 10 feet wide x 40 feet long = 400 square feet). If your lawn has curves or odd angles, break the area down into smaller, manageable squares and rectangles, calculate each one, and then add them all together for your grand total.
Here's a pro tip that will save you a major headache: always order about 10% extra sod. This "overage" is your secret weapon for making all the necessary cuts around sprinklers, pathways, and curved garden beds. Having this buffer on hand is far cheaper than realizing you're a few pieces short and having to place a second, costly delivery order.
Once you have your final number (your measurement plus the 10% overage), you're ready to talk to a supplier. Sod is often sold by the pallet, which typically covers 400 to 500 square feet. Knowing your total helps you order exactly what you need without overspending. It also helps you estimate sod installation cost and compare quotes more accurately.
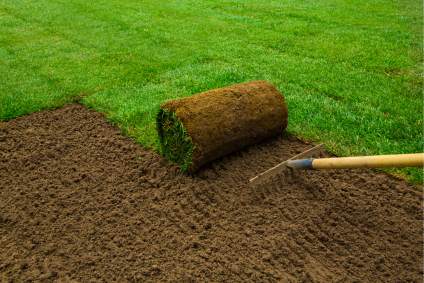
The Most Important Step: How to Prepare the Ground for Sod
If you were painting a room, you wouldn't just slap a new color over peeling old paint. The same rule applies to your lawn. Preparing the ground is the single most critical step for success, ensuring your investment pays off with a thick, healthy lawn.
For the best results, you'll need a few key tools: a rototiller (which you can rent) or a sturdy garden fork, and a landscape rake.
- Clear the Area: Start by removing every trace of old grass, weeds, and any large rocks or debris. You need a completely clean slate for the new sod to make direct contact with the soil.
- Loosen the Soil (Tilling): Hard, compacted ground is like a brick to new roots. Use a tiller to break up the soil to a depth of 4 to 6 inches. This loosens everything up, allowing water and roots to penetrate easily.
- Boost the Soil (Amending): This is the secret ingredient. Spread a 1-to-2-inch layer of compost across the entire area. Compost adds vital nutrients and helps the soil hold moisture. You can also add a starter fertilizer for new sod at this stage. Till the compost into the soil.
- Level the Surface (Grading): Use a landscape rake to smooth the entire surface. Your goal is a flat, even plane. This eliminates low spots where water can puddle and high spots that can dry out, preventing air pockets that will kill the roots of your new sod.
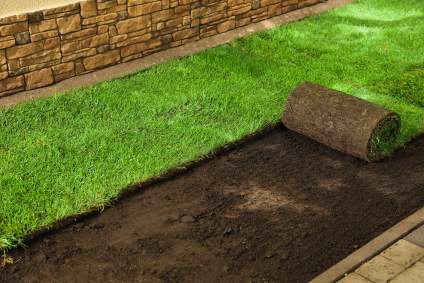
How to Lay Sod for a Seamless, Professional Look
With your soil perfectly prepped, the fun part begins. Start laying your sod along the longest straight edge available---like a driveway, walkway, or patio. This gives you a clean line to build from and ensures the entire lawn looks tidy. Lay the first piece and unroll it carefully, avoiding walking on the prepared soil.
As you begin the next row, the most important trick is to stagger the seams. Never line up the short ends of your sod pieces. Instead, arrange them like bricks in a wall, starting your second row with a half-piece of sod. This technique helps the individual pieces knit together quickly and makes the seams virtually disappear once the lawn is established.
Make sure the edges of each sod piece are pushed together snugly, but don't let them overlap. If you accidentally create small gaps between the rolls, just brush some loose topsoil into them. For curves, corners, or sprinkler heads, a simple utility knife will cut through the sod easily, allowing you to create a perfect fit.
If you are laying sod on a slope, always begin at the bottom and work your way up. This uses gravity to your advantage and keeps the pieces from slipping out of place.
The Critical First Two Weeks: Your Fail-Proof Watering Schedule
The next 14 days are the most important for ensuring your new lawn takes root. Your goal is to create a moist environment that encourages the new roots to grow down into the soil beneath. Think of it as welding the new sod to your yard---water makes the connection permanent.
To get this right, follow a simple watering schedule. The key is to check your progress by gently lifting a corner of a sod piece. The soil underneath should feel damp, not muddy or dry. If your new sod turns yellow, it's often a sign of too much or too little water, so this corner check is your best guide.
- Week 1: Water every single morning for 15-20 minutes.
- Week 2: Water every other day, but for a longer duration (25-30 minutes) to encourage deep roots.
- After Week 2: Water 2-3 times per week as needed, just like an established lawn.
Remember to stay off the new lawn completely during this two-week period, as the ground is very soft.
When to Mow and Walk on Your New Lawn
After two weeks, you can stop guessing and start testing. To see if your sod has rooted, perform the "Tug Test." Gently grab a corner of a sod piece and give it a light pull. If you feel resistance, it's anchored. If it lifts easily, give it a few more days before trying again. This simple check is the best way to know if your sod has taken root.
Once your sod passes the test, it's ready for its first mow. Set your mower to its highest setting---you only want to trim the very top. This is an essential first step in your new lawn care routine, as a tall first cut avoids stressing the new roots. Going forward, always follow the "one-third rule": never remove more than one-third of the grass blade's height in a single mowing.
Finally, when can you walk on the new sod? It is absolutely critical to stay off your new lawn for the first two weeks. Any foot traffic, including from pets, can create depressions and prevent the roots from making good contact with the soil. It's best to wait until after that first mow, typically around the three-week mark, for any regular foot traffic. This allows the surface to firm up, preventing dips and valleys in your beautiful new lawn.
Your Weekend Project Checklist for a Perfect Sod Lawn
Turning bare ground into a beautiful lawn is a straightforward process when you focus on these six key steps. This checklist will help you create a result you can be proud of.
- Plan: Choose the right sod for your sun exposure and order 10% extra.
- Prepare: Clear, till, amend with compost, and level the soil.
- Lay: Start on a straight edge and stagger the seams like bricks.
- Water: Water daily for the first 10-14 days until the soil underneath is damp.
- Test: Use the 'tug test' after 2 weeks to check for root establishment.
- Mow: Mow high when the grass reaches about 4 inches tall.
A successful sod installation isn't about luck; it's about preparation and following the right steps. You no longer have to just wish for a better lawn---you now have the knowledge to create one. Go build a lawn you'll love. If you want sod installation services, feel free to reach out to us at info@jaguarlandscape.com or (469) 910-6600. You can also search for sod installation near me to quickly compare local options and availability.